How to Install Coronado Stone VeneerCoronado Stone veneer can be applied to ANY STRUCTURALLY SOUND SURFACE. No foundation or structural changes are necessary, as Coronado Stone veneer becomes an integral part of the surface to which it is attached. | |
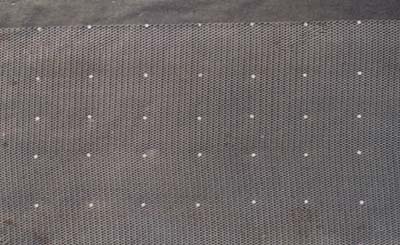 | Surface Preparation: (over wood, painted stucco, foam, or metal) Cover entire surface with 3.4 expanded metal lath, overlap the joints approximately 2″ using 1�-2″ roofing nails or screws depending on surface. Over wood surface, nails or screws should be 6″ apart in every direction. Over plaster board or painted surface or stucco, nails or screws should be kept 16″ on center, penetrating the studs, and 6″ apart. KEEP LATH TIGHT.NOTE: Waterproof paper should be used over an exterior wood surface before installing lath. |
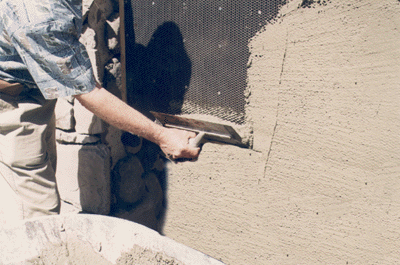 | Scratch Coat: |
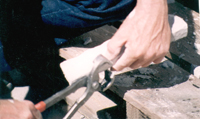
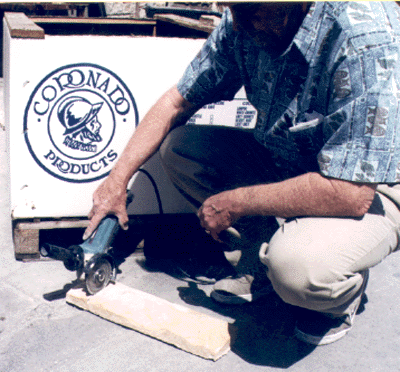 | Trim to Fit: Coronado Stone veneer is easily shaped or cut as desired. This will enable you to “Fit” stones easily into place to insure a natural looking wall with Tight Mortar Joints. Cutting or shaping can be done by using any of the following: Makita 4� hand held disk grinder (with diamond blade), hatchet, brick trowel, or wide mouth nippers (horse hoof nippers) below:
|
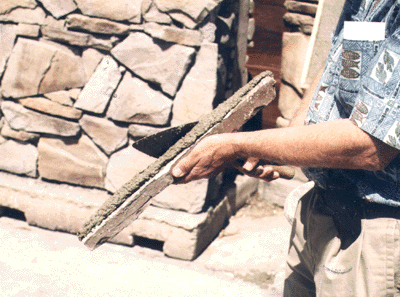 | |
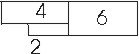
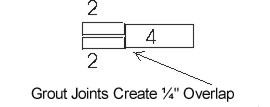
| Applying Mortar to Stone: Height of mortar in center of 4″ or 6″ stones is from �” to 1″ to zero height on ones side (See photo left). Smaller stones require a little more motor proportionately than the larger stones.NOTE: When applying mortar to a (smaller) 2″ stone, you will use almost as much mortar as you would on a 4″ stone. 4″ stones requires just slightly more mortar than a 2″ stone (not twice as much as you would expect). Remember: Too much mortar can cause slipping! NOTE: When installing Random shaped stones (as in River Rock or Split Fieldstone) apply approximately 3/8″ to �” of mortar to the entire back of stone. Another option is to apply enough mortar to middle of stone so that when pressed in to position you will have approximately 5/16″ to 3/16″ of mortar on back side. Slipping and sliding of stones occurs when too much mortar is used. This is acceptable as long as you work stone into place pushing out excess mortar. Push the stone firmly into place and “wiggle” the stone slightly to set the bond. YOU SHOULD PUSH FIRMLY ENOUGH SO THAT THE MORTAR IS SQUEEZED OUT AROUND THE EDGES OF THE STONE. If sliding or slipping occurs, the mortar may be too thin, you may be using too little mortar, or you may be using too much mortar. Also, if your are using thin-set, you could be using too much. Applying Mortar to Large Stones – When Slipping or Sliding Occurs In general, if you have the right mortar consistency and the surface is properly prepared, you should only need 3/8″ to 1/2″ of mortar covering the entire back side of stone. There are several methods of applying mortar to back of stones, but the end result should enough to have some mortar squeezing out of grout 3/16″ to a 5/16″ of mortar on back of stones if you checked it. Deciding how to PLACE THE STONES ON THE WALL: Grouted vs. Drystacked Products such as Country Castle (that are recommended to be grouted) are manufactured in modular sizes to compensate a �” grout joint. Example of actual height sizes of Country Castle are: 1�”, 3�”, 5�” 7�” Coronado recommends applying the stones using a 2 stones off of one stone ratio rule for the “ashlar pattern.” as shown below: Coronado’s Belgian Castle is made to be Drystacked (containing no grout joint). These stones are manufactured with even numbered heights including 1″ 2″ 3″ 4″ etc.
The mason’s goal is to minimize long vertical or horizontal grout joints. A general rule of thumb is that vertical grout joints should not be higher than two small stones or one large stone. Horizontal grout joints should not exceed 4 to 6 feet. Coronado’s stones that are manufactured to be “dry stacked” can be grouted. Alternatively, stones manufactured to be grouted can be dry stacked. The consequence of grouting stones that were meant to be Drystacked are narrow and loose joints because the joints have not been allowed for like in Belgian Castle.
The above picture shows the problem of aligning the top and bottom joints when grouting stones that were manufactured to be Drystacked. Fig. B is an example of how to correct this problem by using the “2 on 2” ration pattern. | |

530.243.3037
7am - 4pm M-F & 7am - 4pm S

Powered by Vertical Menu Theme